The family room is going to be set up as a small home theater space. Kincaid will build a "ceiling cloud" drop ceiling section, which will house the air diffuser and some theater style lighting. It will also bring the ceiling mount height down a bit for a video projector.
I've been using Google's SketchUp to visualize the space. Its a pretty easy program to work with, and it really helped plan the space out. I may do some more of these for other spaces too.
Looking through the back wall, one can see the projection screen, speaker locations, ceiling cloud, and theater-style seating. I plan to provide 3 "formal" seats, along with plenty of room for bean bags or a couple of club chairs. I may decide to go with a curved sofa sectional instead of traditional theater seats.
Inside, at the back corner. Screen size should be in the 80" range, which should be plenty for this room, which is 14' x 14.5'.
Room section shows the proposed shape of the ceiling cloud.
This room section shows the shape of the ceiling cloud at the ceiling. Notched detail around the edge is for uplighting to create a "floating" ceiling look. Next to the person, the equipment location is shown.
Madness or Talking Heads?
Why did I name this blog that way?
Monday, March 31, 2008
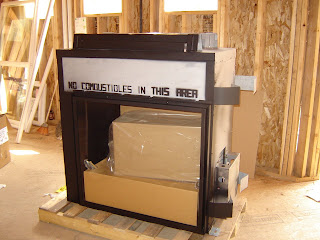
No Combustibles In This Area!
The see-through fireplace is installed. This gas fireplace has a large enough glass front and back that we'll be able to see the trees outside as we walk around inside. Sitting in the Great Room should provide a nice cozy fire, in addition to a view. Hey you can have your cake and eat it too!
The fireplace arrived, but there's nowhere to put it just yet.
Cutting in the opening for the fireplace. We lose the window in order to run the venting required. Too bad - we'll miss having the window, but the fireplace itself is like having a middle window. We'll still get plenty of light during the day, and it will be way cool at night.
The fireplace is installed. We'll box around it & face it with stone inside & out. Custom casework will fill out the sides to provide bookshelves and hearth.
The fireplace mounts flush with the outside wall. Stainless trim kit is on order, and we'll face this area with stone. Not sure if we'll do a hearth out here, probably not.
Sunday, March 23, 2008
Upper Deck Progress, HVAC installed
The framers built most of the upper deck last week, as well as finishing the framing in the Master Bedroom/Bathroom & Dining Room areas. Dorral and his crew were also back from Idaho to finish the furnace installation.
Upper deck is nearly complete. The decks are mostly cantilevered, with only two posts required to support the deepest sections.
This pic is from the deck doors closest to the Billiard Room. The deck wraps around to the Eating Nook & provides a nice view of mountains and the greenbelt.
Another shot from the trail, this time with upper deck in place.
Frames for the built-ins in the Dining Room are done. These will be cased with wainscot, columns and then painted.
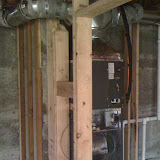
Upstairs heating/AC unit is installed in the corner of the garage. Most of the ducting is also installed throughout the ceiling.
The heating/AC unit was mounted up high so we can still have some storage underneath. We'll have a sink and potting bench in this corner.
Tuesday, March 18, 2008
Dining Room Design Layout
More design decisions today. The dining room is an open space, defined by half-walls. The half-walls will essentially be built in bookshelves.
Dining room layout. The 2x12's on the floor are to show the basic layout & also simulate the depth of the built-ins. We'll place columns at the corners of the space to help define it. Short cross-pieces are there to help us figure out where the half walls stop to create the walkthroughs. I think we'll lengthen the walls a bit from what this pic shows.
Another change in the Master Bath. Curtis (behind the ladder) indicates where we want this wall cut down. Basically we are flipping the shower 180-degrees, in order to open the back of it up. Without the wall height, we'll have a more open feel and the window to the left won't be blocked. The shower heads will be situated at the stub wall in the foreground instead.
Sunday, March 16, 2008
Design Time
Now that framing is almost wrapped up, its time to start thinking seriously about design ideas. So far, we've spotted sink locations (there are 3 in the kitchen area and one in the upper garage), worked out the final design of the master bath, and located gas lines for outdoor deck heaters, barbeque and a fireplace.
Last week Robert chalked out the cabinet layout in the kitchen for us to visualize. The longer peninsula island will change a bit, and we plan to add an espresso bar. We can now walk through the house and get a sense of the traffic flow past the dining room and into the kitchen, or moving from Eating Nook back into the kitchen or out to the deck.
Saturday, March 15, 2008
Roof Complete, Deck Construction Underway
The guys made a lot of progress last week, finishing the entry porch getting the rest of the roofing on. The place is drying out quite a bit, despite plenty of rain. Windows are going in, and the decks are taking shape. Most of the lower deck is framed, and they've started on upper deck already.
Roofing is finished!
The covered entry is cantilevered, so it doesn't even really need columns or posts or whatever. We plan to have something there anyway. In fact, the corner of roof covering that little deck to the right of the picture is the same way - its held up by a chunky beam, so it doesn't need a post. We'll put something there that matches the style of the entry porch.
Lower deck is almost framed in. Each section involved a pretty big beam, which the guys had to wrestle into place. In this pic, the lower deck has one more section left - it will run out to the edge of the concrete foundation wall.
Upper deck was started last week. The first bit here extends out in front of the eating nook. Its about 6'-6", and goes to about 12' once it wraps the corner. You can see the beam-sized opening where the next joist would go. This one is a beast...
The guys muscle the beam for the upper deck into place. This beam runs from inside to outside, in a cantilever fashion. These beams are over 15 feet long and allow the decks to have minimal support posts (only 3 total for two 50-foot decks!). I took this pic right before Robert made an executive decision that the section of duct had to go. The guys were trying to work around it, but there was no way that was going to happen...
Sunday, March 9, 2008
Yesterday we had roofers, plumbers & framers all working on the place at the same time. Sounded like a warzone in there. The last of the roof sheathing went on, and about half the roofing as well. I think the roofers are working today, so the place should be relatively rain-proof by tomorrow or so.
Next week, we'll see the decks go in, which will finish the look of the place out quite a bit. The entry porch is on its way too. We chalked out the kitchen layout, so we could plan plumbing locations. We decided to put the sink in the island, with a prep sink in the peninsula (second island?). Also, I plan to make a little espresso bar location in the eating nook, so it gets a small sink too. We'll have a pot-filler at the cooktop location, so I guess that covers it!
Wednesday, March 5, 2008
Roof Construction Finished This Week
The framing stage should wrap up by the end of the week, with the final sheathing on the roof. The roofing crew wants to come out this weekend & put the shingles on, which will be great since the place will dry out a bit.
Standing in the upper garage. Mudroom doorway is visible.
Fascia is installed on the front & side of the roof - they are working on the backside this afternoon. There's still a covered entry to build at right.
Dorrinda is standing in the eating nook checking out the view. On a clear day like this, we can see Mt. Baker from the side window.
Looking into the kitchen. You can see the gas pipe running up in the ceiling & down the wall for the cooktop. Last week we chose several locations to stub gas pipe - decks for deck heating and barbeque, fireplace in the great room, water heaters, clothes dryer, etc.
Subscribe to:
Posts (Atom)